Free Crochet Patterns from Crochet N More
| Free Newsletter Four New free crochet patterns each month. Delivered twice a month. |
||
The Dog House Help Us Out CE Links
|


Crochet pattern courtesy
of Crochet 'N' More To print a new copy
visit:
The
following pattern is my original design. MATERIALS: Red Heart Super
Saver 4 ply acrylic yarn (main color) Difficulty: DIFFICULT R1: With 3 strands held
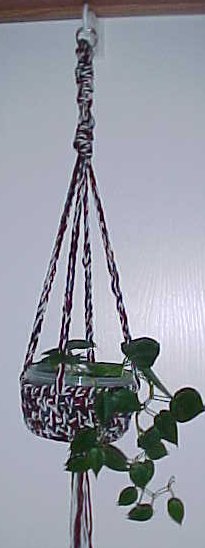
together (one strand of Simply Soft and two strands of Red Heart) R2: Ch3, do not turn. Dc in ea st and in the spaces between all stitches. -28dc- R3-4: Ch3, do not turn. Dc in ea dc. Join wiht sl st. -28dc- R5: Ch1, do not turn. Sc in spaces between all dcs. Join with sl st. R6: Ch1, Rev Sc around. Join with sl st. Fasten off. HANDLE: Now you have 4 long chains that you have to fashion into the hanger. You have the plant hanger, the handles and the key ring tied to it for hanging.
BUT, you have the 4 strands or chains hanging loosely. I worked what I remembered
as macrame knots but I didn't work them correctly. Finish your hanger with square
knots like on the ones on this page: To help you visualize how I did my knots, look at the picture for the square knot... I took the red strand behind all 3 remaining strands and made a loop. Then I brought the tail of the red strand around the remaining 3 strands and put it back through the loop I had made and then tightened the knot. You can work the knots in any fashion... the point is to secure the ends. When the chained strands are worked in use your crochet hook to weave the yarn tails into the work and trim the excess. FRINGE: Insert bowl with your plant into the hanger. HAPPY CROCHETING
Back to the free crochet patterns directory For stitch abbreviations and instructions please visit our Crochet Basics page:
|
||||||||