Free Crochet Patterns from Crochet N More
| Free Newsletter Four New free crochet patterns each month. Delivered twice a month. |
||
The Dog House Help Us Out CE Links
|


Crochet pattern courtesy
of Crochet 'N' More To print a new copy
visit:
The
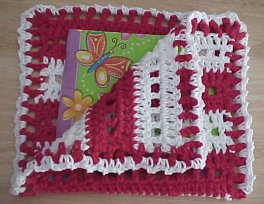
following pattern is my original design. MATERIALS: Cotton Yarn
4ply WW (Red & White) Difficulty: EASY/MEDIUM R1: With Red, Ch29. Dc in the 4th ch from the hook. Dc in ea rem ch. (27dc) R2: Ch3, turn. Dc in next
dc. (Ch1, sk next dc, dc in next dc) across to last dc. R3: Ch3, turn. Dc in ea
dc and in ea ch1 sp. (27dc) Fasten Off. R4: Join white in the first st on R3. Ch2, dc in ea dc. R5: Rep R2. R6: Rep R3. Rs7-9: Rep Rs4-6 with Red. Rs10-12: Rep Rs4-6 with White. Rs13-15: Rep Rs4-6 with Red. Rs16-18: Rep Rs4-6 with White. Rs19-21: Rep Rs4-6 with Red. Rs22-24: Rep Rs4-6 with White. EDGING Join Red as before in the
first st on the last row. Working down the side into the row ends, (Ch1, dc in next row end) down the side. (Ch1, dc) 3 times in the corner st. (Ch1, sk next st, dc in next st) across the bottom. (Ch1, dc) twice in the same sp as the last dc. Working down the side into the row ends, (Ch1, dc in next row end) down the side. To finish the last corner, (ch1, dc, ch1) in the same sp. Join with sl st. Fasten off. FINISHING Fold piece in half, lining
up the corresponding stitches. With the fold on the bottom, join white through
the first two corresponding stitches on the bottom of the right side. 2sc in
the same sp. Ch2. Working in the front piece only, (2sc in the next ch sp, ch2) all the way around the front, turn and work same around the back until you've worked all the way around the outer edge. Join with a sl st and fasten off.
HAPPY CROCHETING
Back to the free crochet patterns directory For stitch abbreviations and instructions please visit our Crochet Basics page:
|
|||||||